I recently sent an order of Vintage Blocks to a lovely children's decor shop in Cape Town called Cupcakes and Cowboys.
Here are some photos showing the steps in making the blocks.
Use your imagination and create a set for yourself, friends and family.
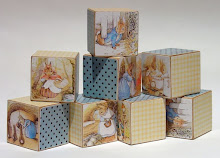
 A sample of a complete set.
I use meranti wood, which is a good quality hard wood. My have my local wood merchant cut lengths of 1.2m x 5cmx5cm
The first step is to paint the entire length of wood with a coat of white acrylic paint. Wait for it to dry and then cover with strips fof different coloured pattern paper. I use a solution of wood glue, diluted with water. Make use of scrapbook paper and wrapping paper. Another good idea is to buy a small piece of cotton fabric you love and have colour copies made.
After you have covered the length of wood, cut them into square blocks.
In the photo above you can see wood thats been covered with paper and then cut into blocks.
 Now you have blocks with 4 sides covered in pattern paper and 2 sides still in raw wood finish.
Your next task is to paint the exposed wood with a layer of white acrylic paint. This will seal the wood and give a non porous surface for the glue to adhere to.
 Print the images you want to use slightly larger than the blocks. This way you won't have a problem with pictures being crooked or not fitting.
 After the layer of white paint has dried you will find the surface feels rough. Give the painted sides of the blocks a quick sand with a fine grid sanding paper to smooth the surface.
 Use your diluted wood glue to adhere the images. Make sure to rub out any airbubbles once the image is stuck on the block.
 After the glue has dried the hard work starts. Use sanding paper to sand all around the blocks, exposing some of the wood and giving it that vintage look. Make sure to also round the edges of the blocks. Hold the sanding paper at an angle to the edge of the block, this ensures that you only sand on the edge and not damage the paper.
 Clean of any dust from your blocks and use a sealer to protect them. Use a good quality water based sealer that won't yellow with age.
There you have it. A simple way of creating a stunning addition to your child's room.


No comments:
Post a Comment